Last year's poncho craze (it was kind of crazy wasn't it?) didn't suck me in completely. I did make a few, only one of which was for myself and which i have worn out of the apartment a total of 2 (yes, that many) times. It is good for days when it's chilly and i haven't gotten out of my pajamas and i want to read in bed, or for when i'm watching a movie and want to have something wrapped around me but don't want to deal with a whole big afghan. That's my take on the poncho. I liked them on some people, not so much on others, but it just is not a practical garment for me.
However, the shrug! Oh, the shrug. Finally a garment that was designed specifically for me: practical, unobtrusive, can be worn under jackets, extends the wearability of summer tops... oh, the shrug.
My arms are ALWAYS chilly and the rest of me is often too warm to wear a sweater. I love the shrug.
I knit Shimmer from knitty and liked it, but I found the back of it a bit gape-y (that is TOTALLY a word... ). I'll post pics of shimmer later.
This is the first thing that I have designed that is wearable and that I am actually happy with! I thought I would share the pics and the pattern with you all (actually, I don't know who i'm kidding with the "you all" since i have no idea if anyone has been here or would even be coming by... but a girl can hope right?)
This is also my first attempt at writing a pattern, so feedback would be appreciated.
Front view:

I never know how to stand when I'm having my picture taken!
Back/Arm view:
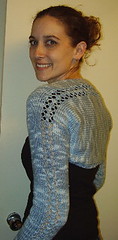
it's a little wierd smiling for photos you are taking with the timer... isn't it?
Now the pattern:
Lace Panel Shrug
Materials:
o TLC Cotton Plus (51% cotton, 49% acrylic; 3.5 oz (100 g) - Approx. 186 yd (170 m));
o Color: Light blue which I over-dyed with dark blue Dylon dye.
o Yardage: approx. 550 yards/510 m – ish. (I am not 100% sure of the yardage needed, but it would be about 2.5 - 3 skeins, definitely not 4 for the size that I made for myself.)
o US9/5.5mm needles, straight or circular
**Update: o US7/4.5mm circular needles (at least 29" - or big enough to accomodate 168 stitches)
o Safety pins or similar markers to mark tops of sleeves
o Gauge: approx. 4.5 st/inch over stocking stitch; 7 stitch lace panel approx. 1.25 inches
Lace pattern (over 7 stitches)
Row 1: sl1, k1, psso, yo, k3, yo, k2tog
Row 2, 4: purl
Row 3: k2, yo, sl1, k2tog, psso, yo, k2
Repeat these 4 rows for the lace panel.
Abbreviations:
sl1 slip 1 stitch, purlwise with yarn in back
k2tog knit next 2 stitches together
psso “pass slipped stitch over” used in both “sl1, k1, psso” where you slip one stitch over one knit stitch, and in “sl1, k2tog, psso” where you slip one stitch over the stitch worked in k2tog
ssk “slip, slip, knit”: slip next 2 stitches knitwise, place both back on left needle and knit together.
M1 “make one” pick up the horizontal “bar” between the stitch on the right needle and the one on the left, place it on the left hand needle and knit it through the back loop
Right Sleeve
Beginning at right sleeve cuff, cast on 40 stitches.
Rib cuff:
o Row 1: k1, p2, *k2, p2*, k1
o Row 2: k3, *p2, k2* end k3
Begin working in stocking stitch and lace pattern (row count begins at this point)
o Row 1: Knit first 17 stitches, place marker, work 7 stitches in lace pattern, place marker, knit remaining 16 stitches.
o Row 2: Purl
o Work in pattern, decreasing 1 stitch each end of row 7 and every 6th row 3 more times (dec. 8 stiches total – 32 stitches)
o Continue to work in pattern (st. st./lace/st.st.) increasing 1 stitch each end of 8th row 13 times (inc. 26 stitches total – 58 stitches)
o Work 2 rows even (130 rows from beginning of lace)
o Place safety pins at each end of row to mark top of sleeve.
Back
(reset row count at this point)
Shoulder decreases & back increases
o K2, ssk, work in pattern to last 3 stitches, k1, m1, k2
o k1, purl to last stitch, k1
o Repeat these 2 rows 9 more times (10 dec and 10 inc made – 58 stitches)
Shoulder decreases & back worked straight
o K2, ssk, work in pattern to end
o k1, purl to last stitch, k1
o Repeat these 2 rows 9 more times (10 dec – 48 stitches)
Neck/back worked straight
o Work in pattern as established with no increases or decreases
o k1, purl to last stitch, k1
o Repeat these 2 rows 14 more times (30 rows total)
Shoulder increases & back worked straight
o K2, m1, work in pattern to end
o k1, purl to last stitch, k1
o Repeat these 2 rows 9 more times (10 inc – 58 stitches)
Shoulder increases & back decreases
o K2, m1, work in pattern to last 4 stitches, k2tog, k2
o k1, purl to last stitch, k1
o Repeat these 2 rows 9 more times (10 inc and 10 dec made – 58 stitches)
Work 2 rows even. Place safety pins for top of arm
(reset counter)
Left Sleeve
Working in pattern (st. st./lace/st.st) decrease one stitch each end of 1st and every 8th row for 13 decreases (26 stitches decreased total – 32 stitches)
Work 8 rows even in pattern
Increase 1 stitch each end of row and every 6th row 3 more times (8 stitches increased – 40 stitches)
Rib Cuff
o Row 1: k3, *p2, k2* end k3
o Row 2: k1, p2, *k2, p2*, k1
Bind off loosely. Block (or don't. your choice) according to yarn requirements.
**Update! or, "I can't believe I forgot the edging AND the measurements... d'oh"
After binding off, sew up sleeves from cuff to the safety pins you put in place while knitting.
With US7/4.5mm circular and starting from one underarm pick up 168 stitches around. Join and knit 2 x 2 rib in the round (k2, p2) for 4 rounds. (or more if you want a wider band of edging). Bind off loosely in rib.
There you go! If you (all of you there in the crowd who have rushed over to see me) decide to try this, let me know how it goes, if it works/doesn't work etc.
OOPS - i forgot... I have to add measurements when I get home (I'm TOTALLY working so hard at work right now)...
**Update:
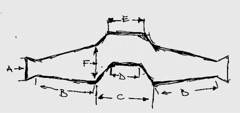
my rough sketch of what I wanted the shrug layout to be. I forgot to take measurements when I had it blocking. d'oh.
So, here it is. I hope you can see the letters on the sketch. The measurements here will correspond to those letters. The measurements are pre-stitching, i.e. before you sew up the sleeves.
A - cuff measures 10"
B - sleeve measures 22" cuff to underarm (ignore the fact that the sketch does not go all the way to the cuff... )
C - underarm to underarm is approximately 18"
D - top of back 6" (approximate)
E - bottom of back 12" (approximate)
F - top of sleeve 14"
So, FINALLY that is it. Sorry for all of the mess-ups!
This is so lovely! Thanks for all your hard work on the pattern!
ReplyDeleteLori!! You are funny! I think you deserve a prize for you hard work on that shrug!! Ah some day I will be ready to try my hand at my own apparel pattern! For now I will stick to purses!
ReplyDeleteyour shrug is so cute!! i love the lace =) i'm going to try making it as soon as i get some money for yarn =p
ReplyDelete