Sunday, December 11, 2011

New Coat 2.0

Oh wow, I love this coat.

DSCF0784

Pattern: Simplicity 2508 ("Inspired by Project Runway"). View C (I think), collar C
Outer Fabric: Cotton corduroy. It's a bit stiff but so soft & cozy at the same time. It will relax with wear and I'm sure I'll be wearing this a lot this winter.
Lining fabric: I made my own quilted lining with a polyester lining fabric and a wool batting from the quilting store. I thought this would add enough warmth that I can wear the coat in the winter without adding too much extra bulk. I'm quite happy with it but haven't tested it in the real cold yet.
Mods: None that I can remember. Oh, I moved the back tab thing (name?) down about 2-3 inches and added about 3 inches to the sleeve length. I may have overcompensated on the sleeves but they're definitely nice & long now.

DSCF0790

I'm really glad I made the other version first because that really made this version go much smoother. I started cutting the pieces last Sunday and finished sewing Saturday afternoon.

DSCF0789

I haven't ever had a coat that has the closure off to the side but I really like the look. It's very warm with a double layer in the front. I made the welt pockets on seam again for this version. I tend to walk with my hands in my pockets so this style is more practical for me.

DSCF0786

(I think i was just standing funny. I don't think the coat bunches up like that normally)

The only real "d'oh" moment I had was when I went to sew together the first pieces, after cutting all the outer fabric. I was being so careful with the pattern pieces to make sure they were all situated on the corduroy the same way so i wouldn't have the nap going different directions. I was pretty impressed with my efforts until I realized I had placed (and cut) them all so the nap was upside down. It's not something anyone would notice unless they were petting my arm (or other area which we are NOT encouraging), but I notice and it's definitely a "d'oh".

DSCF0788


Now back to Christmas Present knitting and Christmas baking. I'd love to hear what other people are making for the holidays. I haven't fully decided on my baking list and I have to come up with gifts for another couple of people.

Wednesday, November 16, 2011

DPN Roll

A couple of weekends ago I wanted to make a pair of mittens so I had to go through my cup of unsorted (gasp) DPNs (double pointed needles for any non-knitters) to find the needles I needed. I thought "I really should make a needle holder for these" which is what I thought every single time I needed anything out of that cup.

So I finally just got off my butt and made one.

DSCF0686

The outer fabric was leftover pieced scraps from a previous project and the inner fabrics were an assortment from stash.

DSCF0689

I consulted a variety of tutorials but in the end just winged it based on the measurements of the outer fabric and the number of sets I had.

DSCF0692

I feel so much better now, having all the DPNs in their homes, sorted and ready to be used.

Monday, November 14, 2011

Jacket

Another muslin that turned out wearable! And, oh boy did I ever learn a lot making this one.

I don't remember what put the idea in my head to make myself a winter coat but once it was there it wasn't budging. I searched online for coat patterns and came across Simplicity 2508 ("inspired by Project Runway"). I started to fixate on a mid-thigh length coat in corduroy, but I knew I'd be making a muslin first. I've never made anything this complicated before and there was no way I was going to risk ruining that much fabric.

The issues (or "interesting" complications) I had with this pattern were numerous and started from the moment I had the pattern envelope in my hand.

In order to make you feel like a "designer" the pattern envelope doesn't tell you how much fabric you need for each of the views. Instead it has the fabric requirement for each component of each view listed separately. Oh, and the pictures aren't labelled "A, B, C" etc but the parts listed under the fabric requirements are labelled this way, so there was a fair bit of "I think this is the right one..." going on. So, to my math-addled brain this was already a nightmare. For jacket with front "A" you need 1 7/8 yard. Then for collar A you need 3/8 yard. Then for the long sleeve you need 1 yard, the pockets are another 1/2 yard etc. Here, in the comfort of my home (with a calculator and spreadsheet) I can figure that out no problem. In the crowded fabric store when I was hungry it was like every horrible school nightmare you've ever had rolled into one.

In the end I just got what I thought was right and ignored the pattern envelope altogether. The fabric I used for the muslin was "unknown fiber" from the clearance section. There was only 3 1/2 meters left on the bolt so I was hoping I'd have enough for the jacket. After I laid everything out I ended up only needing about 2 1/2 meters.

The next issue was in the less than complete instructions. If I had ever made a tailored jacket before it wouldn't have been a problem at all, but there were a number of things I had to figure out for myself (thank you internet). One problem I had was especially stupid/hilarious and would have been avoided by a note in the instructions:

When I had everything cut out and was starting to sew the front & side front I was horrified to find that the front pieces were about an inch & a half shorter than the side front pieces! I have made this kind of weird mistake before when cutting out pieces but I had been so careful! I finished sewing the outer jacket and decided I needed to just cut the other pieces to match the mis-cut short front pieces.

(If you've ever made a coat before you're probably cringing)

It wasn't until I had the lining sewn into the coat that I realized that I hadn't made a mistake with cutting and the front pieces were supposed to be shorter to allow for the hem. Say it with me: "D'OH"

Okay, enough going on about it. On to the pictures!

Pattern: Simplicity 2508 ("Inspired by Project Runway")
Fabric: clearance section unknown fiber herringbone tweed
Mods: unintentionally shortened the length. Oops.

DSCF0708

I forgot to add length to the sleeves so I won't be reaching for anything while wearing this jacket.

DSCF0731

DSCF0736

The fabric is a tweed herringbone but I'm not sure what the fiber content is. It's a bit thin so I wanted a warmer lining. I didn't want to spend too much (*cough* anything *cough*) on this beyond the $18 for the outer fabric (score!) so I made my own quilted lining using a sateen sheet & a flannel sheet. It worked out pretty well actually.

DSCF0710

I think I should have moved this back tab (what is the name for this thing?) down about 2 inches at least. It lands in the middle of my back which is a bit odd.

In keeping with my cheap/thrifty/"I can just make that" ways I ended up making buttons using polymer clay. I really like how they turned out. I'm not completely sure the square buttons were the best choice though. They may end up getting swapped out if I get too frustrated with them.

DSCF0742

All together I really am pleased with the jacket and I will be able to wear the muslin.

Sunday, November 13, 2011

Tunic top

I'm finally understanding the benefit of making a muslin when trying a new pattern. It helps me figure out what size to make, what changes to make to the pattern. It helps me catch issues or learn new techniques before cutting into the "real" fabric. If the muslin turns out to be wearable, well that's just gravy, as they say.

This top was technically a muslin in that I wasn't too attached to the fabric and I wasn't sure if this top would really work for me. When I bought the fabric a few years ago (? not sure when I obtained it) I really liked it and must have had some project in mind for it. Whatever that plan was the fabric sat un-cut for a couple of years. I couldn't ever find something I wanted to do with it.

DSCF0729
(probably could have ironed before taking the pictures)

Pattern: Simplicity 2365 view A
Fabric: cotton stripe (unknown manufacturer)
Mods: none, technically. Originally I cut & sewed the long tunic length but, to be blunt, it looked like an old-timey nightshirt on me. I think it was the stripes. So I cut it off to shirt length and hemmed it and now I really like the shirt. It fits just right and is very comfortable.

DSCF0728

This was my first time sewing pin tucks. I really like the subtle shaping and texture they give to the fabric. I wasn't sure how they would look with the stripe but I do like it. I feel kind of conspicuous in any pattern so I am open to opinion on the stripes. I don't wear stripes (or any pattern really) that often but this is growing on me.

I really do like when my muslin turns out to be wearable and I'll definitely be making another one (or more) of this top.

Saturday, October 01, 2011

New Jeans

I was on vacation this past week. It was kind of sudden so I decided to just do things I normally would be daydreaming about at work. I went to the Glenbow Museum (post for another day - the coolest exhibition of period costumes from movies!), had a massage, got my hair cut and visited fabric stores and yarn stores. It was a really nice break. I hardly touched my computer (a vacation in itself as my entire job is on the computer at work), watched TV, read and cleaned & organized things in my apartment.

The one thing I had planned to do but was dreading was going to the mall. I don't know if I'm missing some girly gene but I really don't like trying on clothes and I hate going to the mall if I really need to buy clothes. (Oddly I love people watching at the mall but only if I don't have to buy anything). So I put it off and ended up not going.

However... As I mentioned, I did go to the fabric store, where they sell fabric (you see where this is going, right?)(also the title of the post probably gives it away).

New Jeans

I used the pants pattern from Sew U with my alterations from the last pair I made. The original pattern is quite flared at the hem so I redrew the pattern to make more of a boot-cut. I forgot to make the changes to the waist area I had wanted to make after the last pair so they could fit a bit better in that area but I'm really happy with them.

DSCF0674

DSCF0673

I made inset pockets (not sure if that's the right term) and lined them with some blue plaid from stash. The original pattern only had patch pockets so I figured these out for the last pair I made. (not sure why they look black in the close ups but the denim is a really dark blue).

new jeans

Much easier than trying on 20 pairs at the mall and finding nothing (or overpaying for something I don't really like that much)

new jeans

The fabric is still a bit stiff and my hands were blue when I finished so I'll wash them another time before I wear them. The denim has 2% Spandex so they're very comfortable.

I bought some cotton canvas to make another pair of pants, but that can wait for another day. For now my knitting and the couch are calling my name. It's definitely fall now and I have a lot of wool to make my way through.

Friday, September 16, 2011

Crispy Microwave Potato Chips

I'm a snacker. I snack. I snack too much, to be completely honest. My favorite snacks are salty: chips, popcorn, pretzels. This isn't good for many reasons, not least of which is the oil & other stuff in potato chips (snack of the champions).

I'm sure many of you have seen the recipe(s) for microwave potato chips. I've seen it a few different places over the past year or two. When I saw it the first time I was skeptical, but decided to give it a try. The recipe I followed was simple enough: slice the potato very thin (with a mandoline/slicer if possible), blot, spray with cooking spray or oil, arrange on a glass plate or on parchment paper, microwave for 3 minutes, turn the chips over & microwave again. It produced chips, but they were not quite "right" (to my discerning snack palate --ha!). They were crunchy but not crispy, you know? And sometimes they didn't cook evenly so there would be a limp bit in the middle of crunchy.

Fast forward to 2 days ago. I suddenly wanted to try making them again. I get these bizarre brain jumps in the middle of my work day and then spend the rest of the day mulling it over, problem solving or designing a plan while I work (and sometimes it leads me to wasting time online but we'll keep that our little secret). So Wednesday, I wanted to try microwave potato chips again, so I googled it because I couldn't remember all the instructions. This time I came across this plastic ring with slots cut into it. It was a microwave chip maker! This (of course) led me into a google sink hole where I spent (mumble) minutes looking for a place where I could get one in Canada.

Normally I have really excellent Google-Fu but this time I just couldn't find anywhere to get one locally (or on this side of the border). So I sadfaced and carried on with my work.

This is when the brain jump kicked in in earnest. Suddenly I realized I could hack the chip maker at home! Using recycled cardboard! (this is the point where anyone I've told about this starts laughing. So go ahead, I'll wait).

Of course, the minute I got home I had the scissors out and was constructing my chip maker. I tried a small batch, microwaved for 2 1/2 minutes, checked the chips, then another 2 1/2 minutes. When I took the chips out, they looked like "real" potato chips. I tested one and promptly wished someone was there with me so I could brag/gush about my experiment. The chip was crispy!!! Not crunchy, not slightly stiffened, crispy. Success!! I tweaked the process slightly (and made a second chip rack) and proceeded to make a fairly significant amount of chips in a short time. No oil! No additives! Just potatoes and salt.

Here's what I did. If you try this please let me know what you think! Or if you have any suggestions to improve it.

**Of course, please use caution when cutting the potatoes, when using the microwave etc. Don't walk away and leave it running for an hour or something. I think short bursts is probably the best way to go with timing the microwave.

DSCF0385

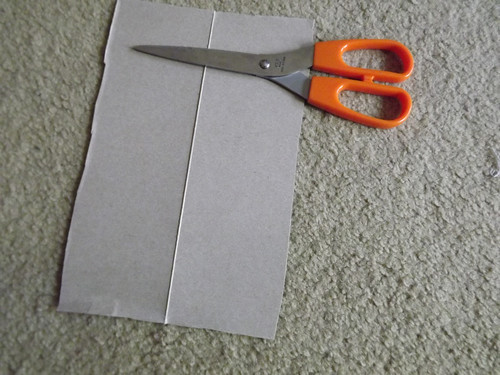
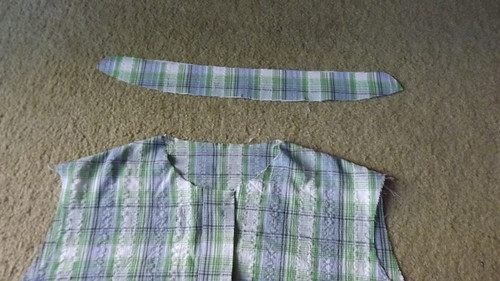
Cut a kleenex box or other piece of cardboard to the size you want. I used the length of the box and the height and then cut down the bottom to match the height. It's approximately 9"x6". You may need to measure inside your microwave to see what will fit.

DSCF0386

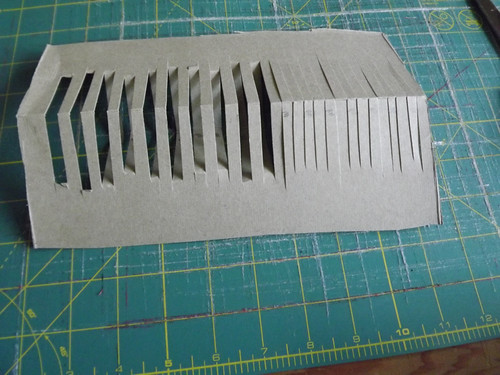
For the first rack I carefully measured 1/4" spacing and cut on the lines. My cutting was a touch wonky as you can see. The second one I just eyeballed and they both work just as good. One suggestion would be to not get too close to the long edge when cutting as this will make the slot too wide. I had potato slices fall out.

When you have your slits cut, cut away every other flap to create spaces for your potato slices.

DSCF0389

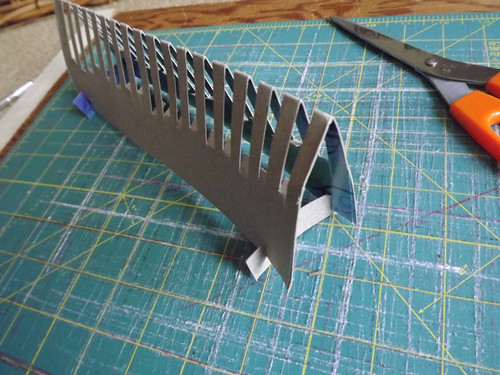
I ended up adding a piece to each end on the bottom to hold the shape and to stabilize it. Depending on how well your piece stands on its own you may want to cut these as well.

DSCF0390

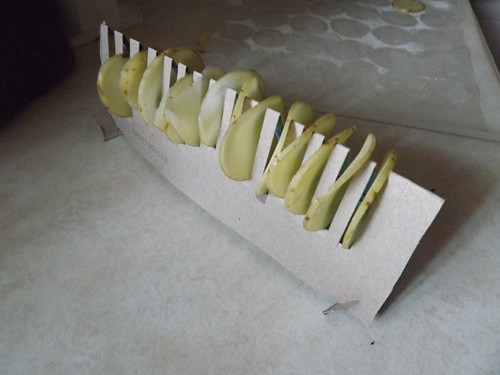
Slice your potato as thin as possible. Blot on paper towels. I added salt before cooking--just sprinkled it on while they were blotting. Load your chip rack and carefully transfer to the microwave. (I had to reload at least 3 times out of the 6 or so batches I made)

DSCF0391

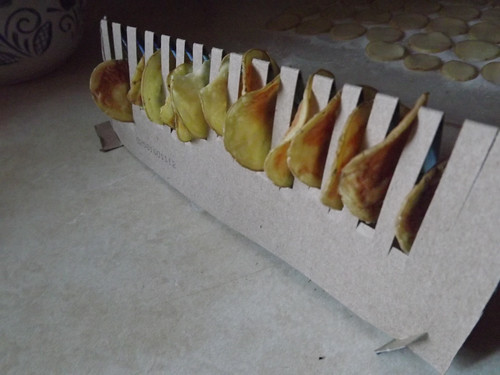
After 5 minutes in total. Mmmm. Chips.

I found that some of them were quicker than others but the most it took was about 6 1/2 minutes. My microwave isn't the most powerful one around so you may have different results.

DSCF0393

I'm not usually a fan of flavored chips (prefer plain) but I was thinking you could probably try those popcorn seasonings if you wanted to make flavored chips. Or just herbs or spices. I'd be interested in any seasoning ideas anyone has. I'm sure I'll be making the next batch tonight!

Tuesday, September 06, 2011

Hoodie!

Just as I was astonished that I was able to make pants (PANTS!!!) earlier this summer, I am astonished I was able to successfully make a hoodie. Not just that I made a hoodie but that I immediately started planning the next hoodie I would make when I snipped the last thread on the first.

DSCF0370 


I used the pattern in Sew U Home Stretch and some heavier weight cotton knit. I thought it would take a long time to sew but, after I had the pattern pieces prepped it only took about 2 hours! I don't know why I thought it would take longer than that...

DSCF0371

(my camera blew out most of the shots and no amount of trying to fix it seemed to really help. oops) The dark navy is one of my favorite neutrals. I love the fabric, it's the perfect weight for fall/spring and for in my office where the temperatures swing between Arctic and Equatorial at least twice an hour.

DSCF0372

I made the size Large and it fits perfectly. I didn't have ribbing that matches the main fabric so I extended the pattern pieces to make a deep hem and cuff. All edges are serged (whee!!!) and I managed to successfully use a twin needle for finishing.

DSCF0378

DSCF0374

My one major d'oh appeared when I went to sew in the zipper. I somehow made one pocket a good half inch taller than the other. Oops!
DSCF0376

Now, if you just take the evidence of this often neglected blog, I haven't been doing much making this summer. On the contrary, I just haven't been finishing much this summer. Making and finishing this hoodie in one afternoon has really kicked my "must finish stuff" drive into gear. Either that or I just need to start documenting my WIPs. I'll try to get on one of those soon.

Sunday, July 17, 2011

Weekend Sewing: D'oh! Meh. WooHoo!

This weekend I was sewing, as I often am, and had a project bomb, one that's wearable but uninspiring, and one that I'm really happy with.

D'OH

This is actually the second attempt to use this fabric. I salvaged enough from the first failure to cut the pieces for a button down shirt. I used the pattern from Sew U. I had success with it the first time I used it so I merrily was on my way cutting the pieces and getting ready to sew.

DSCF0248

When I got to the collar stand I ran into a glitch. I don't know if I cut the body pieces too big or the collar & stand too small but either way, the collar stand & collar are at least 2 inches too small for the neck opening.

D'oh.

Oh, and did I mention I used every last square centimetre of the fabric for the pieces I cut out?

I think I can salvage it by completing the shirt without a collar. I'm thinking more like a U-neck and just hem the opening. (hem? that's not the right word for the neck opening) For the time being it's in time out. If I can't salvage it the fabric will be used for something else along the way. I really like the plaid.

Meh.

When I realized the first shirt was a d'oh I pulled out a light weight knit print I had found in the clearance section of Fabricland a few weeks ago. I decided to go with the t-shirt pattern I had success with earlier this summer and got going. It's wearable but there's something I'm not totally thrilled with.

DSCF0252

I haven't finished the hem and I want to re-do the elastic in the sleeves. The fabric was really slippery for some reason and I found myself frustrated with it. It's a really nice weight though and I think I'll finish it up tonight or tomorrow.

WooHoo!

Another skirt! This is exactly what I pictured when I found this lightweight cotton in Fabricland a couple of months ago. It had this beautiful embroidered edge and I immediately saw a skirt.

DSCF0250

I drafted a simple 4 panel skirt using math that even I can do. I've used this technique before to make a 6 panel skirt. Please to enjoy my fancy diagram created in my word program.


There are many tutorials online, some of them even have pictures AND descriptions and weren't created in a word program that has no business doing illustrations!

I lined the skirt with the un-embroidered half of the fabric width. The skirt was a bit thin and I didn't want to bother with a slip when I wear it.

I'm fairly proud of the zipper as it's enclosed between the skirt and lining. It's not terribly neatly sewn mind you, but it is enclosed between the skirt and lining and that is the accomplishment we are focusing on.

I still somehow managed to make the waist too big. I seem to do this with any skirt that doesn't have an elastic waist. Better than too small but it sits a bit too low. Overall I'm very pleased with how it turned out.

You may have noticed the sudden obsession with skirt making (I have another one I haven't shown you yet). My office-mate & I had challenged ourselves to wear a skirt at least once a week for the summer. It's a little out of the ordinary for me to wear skirts but I'm finding that I quite like them for work in the summer. I realize this is old news to most of you but I'm generally a jeans & t-shirt kinda girl.

************

I have to travel for work this week. I normally don't leave my office but I need to go to Houston to train someone in our office there to do my job. Well, not my job but how to do the job that I do. You know what I'm trying to say. I'm glad for the change but a bit nervous about going. I'm pretty much a hermit lately and I'm always nervous meeting new people.

Also, I live in Calgary. It was 26 Celsius (79F) today and people were talking about how sweltering hot it is. I have lived in hot/humid before but to go from not-humid/barely-hot to really hot/extremely humid in one day will be... uh... challenging I'm sure. The hotel has a pool, where I hope to spend most of my time while not in the office. (Houston, you are welcome in advance for the visual of my awesome shorts-tan)

I'll only be there for 3 days so any amount of low-grade worrying is seriously unnecessary but there you have it. I won't be able to sew (obviously) so I'm planning to take a sock to knit. I'm travelling with a coworker and I'm sure she would be mortified if I had anything larger to work on. I expect I'll be reading a lot on the flight/trip also. Anyone have any good book recommendations? I've been on a spy-novel kind of kick but would be open to suggestions if you've read something really engrossing.

Wow, long post. Okay so hope you all had a great weekend. Oh, and thank you for your comments on the last couple of posts. (I haven't fully worked out how to reply to people yet and sometimes I can't find an email address when people comment from a different blogging platform.) It really is encouraging.

Sunday, July 10, 2011

Swing Skirt

I'm a little late on the Alabama Stitch Book bandwagon. This skirt was making the blog rounds a couple of years ago (I think) and I loved it then but didn't get the book until this spring. I love the style of Alabama Chanin's designs and this skirt is no exception.

Swing skirt from Alabama Stitch Book

The skirt (if you are unfamiliar with the project having just been introduced to the internet or something) is made by stencilling the design and then using reverse applique, entirely by hand. I was nervous about it. All that stitching was relaxing and quite satisfying, but what if it didn't fit! It took weeks -- mostly because I would work on it for a bit and then leave it for a few days.

I'm happy to say it fits perfectly. Imagine here my enormous sigh of relief when I tried it on last night!

Swing skirt from Alabama Stitch Book

I used fabric from 2 different jersey sheet sets (my go-to for inexpensive t-shirt material) and acrylic paint mixed with a fabric medium for the stencil. I may have over-done it with how much I stencilled. I like how it looked but it took a long time to stitch. Next time (oh yes, I'm planning another) I'll do much less stencilling.

At first I wasn't sure how I'd feel about hand-stitching the skirt together. It didn't seem very sturdy before I tried it. I was thinking I would use the serger to construct the skirt but in the end decided to hand-stitch it after all. It seemed right to complete it by hand after putting in all that time. I'm really surprised and pleased with how sturdy it feels.

Waistband - Swing skirt from Alabama Stitch Book

The pattern calls for using fold-over elastic (FOE) for the waistband but I couldn't find any and was to impatient to order it. I ended up using a strip of matching jersey to make a waistband. I think I should have made the waistband an inch smaller but it will be fine for now. If it stretches out I think I can put in some elastic.

herringbone stitch - Swing skirt from Alabama Stitch Book

I played around with different stitches to attach the waistband. The last thing I wanted, after spending all this time making the skirt, was to have the waistband stitches snap when I wore it! I ended up going with this herringbone stitch I found online (I can't remember where, sorry). It is really stretchy and was relatively easy to stitch. I stitched the waistband to the skirt and then did another round of herringbone to tack the seam to the waistband.

Swing skirt from Alabama Stitch Book

This is easily the most comfortable piece of clothing I've ever made and the most time-consuming. I love how it's casual and special at the same time - if I may pat myself on the back a bit!

Monday, July 04, 2011

Vintage Leather Jacket Bag

I keep forgetting to post projects I've completed in the last few months. I have another one for you today, one of my favorites.

I was rolling this idea in my mind for almost a year, since I made my first leather jacket bag. About a month ago it clicked in my brain and I stopped by Value Village on my way home from work. (Pro Tip: Pronounce Value Village with a bad French accent so you're fancy) I found the perfect 70's jacket and made my way home. And forgot to take a before picture, of course. d'oh.

DSCF0125

I used the back of the jacket for the body of the bag. I ended up adding a band around the top to give the bag more depth.

DSCF0220

The jacket had a band across the back at the waist and vertical seams along the whole length of the back. The waistband was exactly the width I wanted for the bottom and the vertical seams add detail to the bag.

DSCF0221

It's nice and slouchy without being too floppy. If that makes any sense. I made the strap long so the bag can be worn cross body, which I love. I am far too clumsy to wear a bag on my shoulder while shopping for groceries. I end up knocking stuff off shelves or dropping my bag. You think I'm exaggerating but... yeah no, I'm that clumsy. Ask my office mate.

DSCF0222

It's lined with some random stripey fabric from my stash. I used a magnetic snap to hold it closed and added some pockets for functionality. It has a great "Dad's old leather jacket" smell (and surprisingly no "gross Value Village" smell!) and has that creaky old leather jacket sound.

***********************************************

I took an extra day off today. (4 day weekend! woo!) After a couple of errands I headed down to Fish Creek Park for a walk and to sit by the creek to read.

I love that Calgary has these places within the city where not only can you not see the city but you can't even hear any traffic or anything.

DSCF0204

DSCF0215

DSCF0210

I didn't stay as long as I had planned, too much pollen & fluff from the trees. My allergies are bad this year and I was getting miserable. On my way walking back out to my car I nearly stepped on an 18" long garter snake (gah I just gave myself the willies thinking about it). I have a teeny tiny thing about snakes. I'm not scared of them but they just give me the creeps. This one was tiny and still icked me out. I'm sure I scared it more than it creeped me out though. I swear it jumped when it saw me. (which just gave me goosebumps in my hair) (I'm sure you're *surprised* there are no pictures of the snake).

Wow got myself off on a diversion there.

When I got home I had the best surprise though: One of my tomato plants has an actual real live tomato growing on it! woo! success (well, a harbinger of success).

DSCF0217

Last year I only had 2 tomatoes on 2 plants all summer. My strawberries are actually producing this year too so I'm really looking forward to those as well.

Happy 4th of July to any Americans out there (and belated Happy Canada Day! to my fellow Canucks).

Tuesday, June 28, 2011

PANTS!!!

I keep forgetting I have a new camera and consequently keep forgetting to post finished projects. D'oh. So, without further ado...

Oh, and, anyone visiting from a place where "pants" means something other than "trousers"... I'm referring to "trousers" here. Adjust your vocabulary accordingly for the duration. :)

PANTS!!! (the all-caps & triple exclamation mark is indicative of my excitement and disbelief over being able to make PANTS!!!)

First up:
I decided to be smart (*cough*for once*cough*) and made a muslin of the pattern before I cut into my "good" fabric. I had just enough of a light weight denim from a thrifted duvet cover to make a pair of pants from the Sew U book.

Pants from Sew U

(I'm sure my neighbors wondered what I was doing standing in the shrub outside my apartment)

The original pattern had a quite wide flare at the bottom. I ended up taking them in 3 inches at the hem and angled up the leg. (my terminology here is noticeably lacking. What's the word for when you work the alteration into the original pattern line? brain empty)

Pants from Sew U

I made the large size which fits me pretty much perfectly. The original pattern is a bit long from the waist to crotch but other than that they fit exactly how I wanted. I've worn these a few times and they haven't fallen apart nor have I felt like I was wearing "homemade" pants. (as opposed to "handmade" pants.)

On to the "good" fabric:

Pants from Sew U
sorry for the wrinkly photo. I mean photo of wrinkly pants. This was after wearing them all day

Changes I made from my muslin:
-made the pants capri length because I stupidly cut the fronts a full inch shorter than the backs as a design choice. I gave them 2 1/2 inch cuffs which are tacked down at the seams.
-shortened the waist to crotch length by 1 inch
-changed the patch pockets to (again what's the word...?) inside pockets. These were an experiment as I didn't have a pattern for them. I'm happy with them but they aren't ideal. Lessons learned for next time

Front pocket - Pants from Sew U

Overall I'm so excited about having made both of these pairs of PANTS!!! and I definitely will be making more. I really like this pattern but I'd be interested in any pattern suggestions if you have them.